Lab 0: Setup
Please Log In for full access to the web site.
Note that this link will take you to an external site (https://shimmer.mit.edu) to authenticate, and then you will be redirected back to this page.
Table of Contents
1) Make a directory for 6.190
In order to make it easy for you to find all your 6190 labs in one place, let's create a folder called 6190 where we will put the starter code for each lab.
Download the starter lab project found here. Extract it. Notice that the file structure is the following:
test_project
    |
    +--->src
          |
          +---> main.c
This is how all of our projects in 6.190 will look this semester. As you add additional files like 6190.h, additional C files, assembly files, etc... we'll add them into the src folder.
To keep things organized move your test_project folder into your 6190 folder.
2) Build Toolchain
For more detailed instructions on Windows setup, see the Windows Setup Section. For Mac and Linux, continue on in this section.
This class assumes basic familiarity with a command line. If you're new to this, fret not. Have a look at a quickstart guide for Mac (similar for Linux). In either Mac or Windows, you will need to open a terminal and navigate (with "cd" and "ls") and execute the commands below.
Use the cd command to change your base directory to be the 6190 directory you created above. You should do this before doing the next step.
The "setup" for the 6.190 toolchain should hopefully be relatively painless. We're now using an all-in-one Python based library that takes care of compilation, flashing, and monitoring the device output. Go here and follow the instructions until you finish the "Configuration" section. You will need to use a terminal.
Note that your setup (in the link above) should have included the following steps:
python3 -m venv 61903_python

source 61903_python/bin/activate

pip install git+https://github.com/jodalyst/llp-bc

llp-bc configure
If you ran these steps, you should now have a directory called 61903_python inside your toplevel 6190 directory. Before starting any lab you should always activate your 61903_python environment by running the following command from the 6190 directory:
source 61903_python/bin/activate
3) Editor
We're asking that you install and use Lite XL for your editor in this class. You can install it from here. It is extremely light-weight, which we believe is good for getting better with your programming.
3.1) MacOS Lite XL Can't Be Opened
When you try to open Lite XL on MacOS for the first time you might run into one of the two warnings below (the specific one you get depends on your application security settings):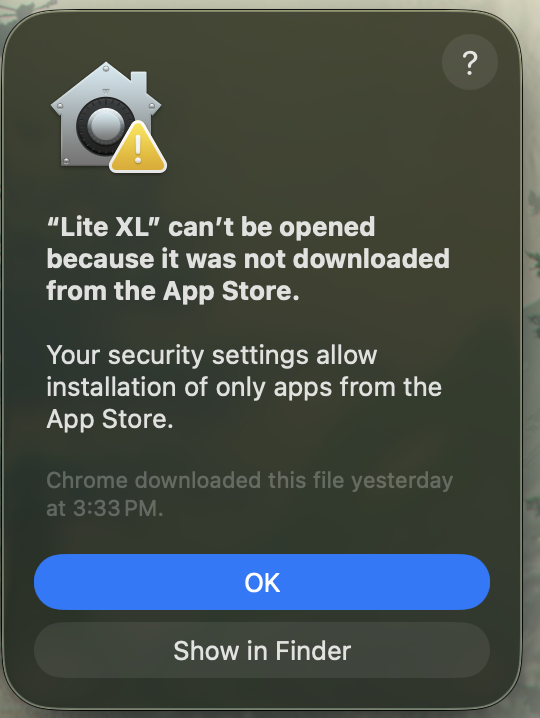
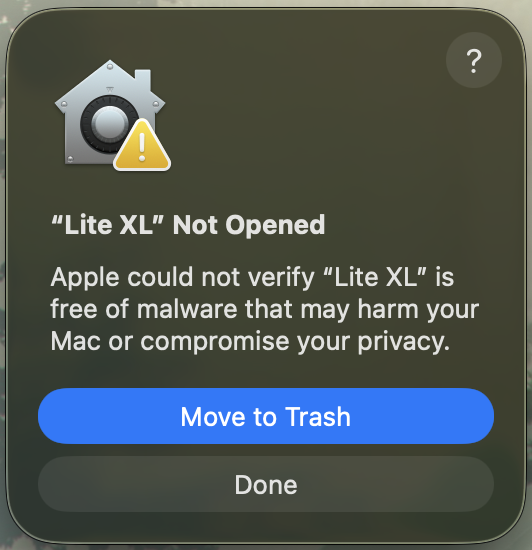
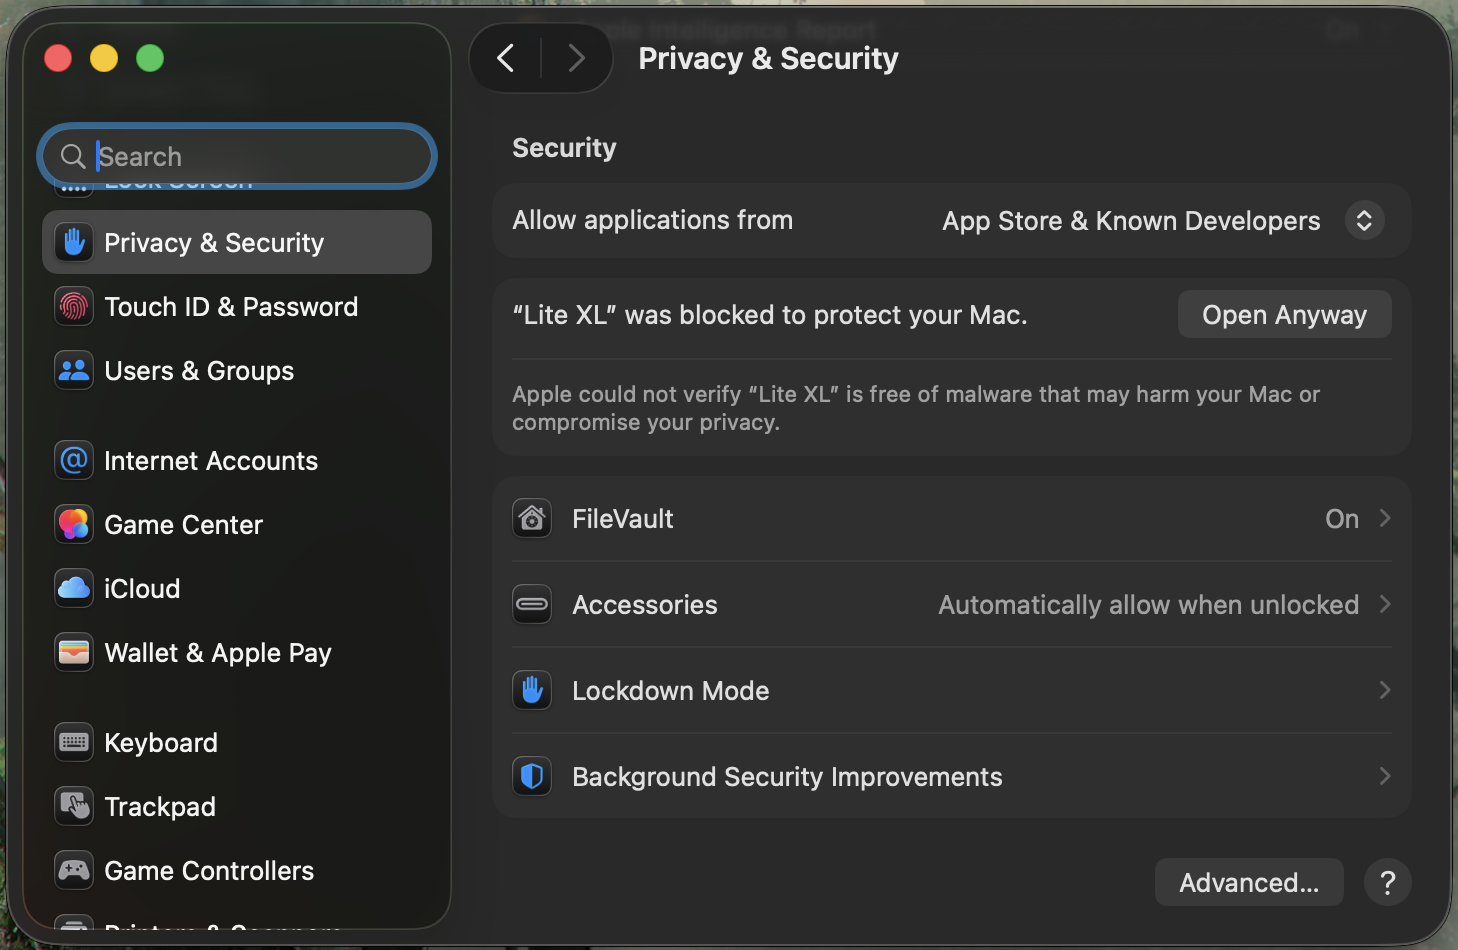
If this happens, open settings, go to the Privacy and Security tab, then scroll all the way to the bottom and you should see that Lite XL was blocked along with an option to "Open Anyway." Click that then you should be good to open Lite XL from here on out.
After you have installed and started it, a few configuration points:
In Lite XL, go to the Settings (the gear symbol at the end of the bar in the lower left corner). In the "Core" tab, in the "General" section, go to the box labeled "Ignore Files:". There are a few file types that will be present in your projects that you don't need to see. You can use the "Add" button to add each of the following:
- ^.vscode/
- ^_history/
- ^%.
Alternatively, you can exclude these types of files and directories by going into the "General" section (as above), and clicking on the "User Module" button, which will open a LUA file, and you can add the following code to the bottom:
config.ignore_files = {
  "^.vscode/",
  "^_history/",
  "^%."
}
After you've excluded these files, make test_project your current project folder in Lite XL using ctrl-shift-c (cmd-shift-c on Mac) and navigating to it1. You should now see test_project in the left column of your editor, and clicking on it toggles it open and shut. Verify you can find your way to main.c. If you click on that file, it will open in a tab for editing.
Using your editor, open up the main.c file that should in your src folder. It should look like below:
#include <stdio.h>
#include "freertos/FreeRTOS.h"
#include "freertos/task.h"

void app_main(){
    int i = 0;
    while (1){
        printf("Current count: %d\n", i);
        i+=1;
        vTaskDelay(100); //delay by 100 milliseconds
    }
}
This code should just give you an ever-incrementing printout.
Be sure to save (ctrl-s, or cmd-s on Mac) whenever you make changes to a project file. Otherwise, none of your changes will get compiled.
If you've closed your file browser, you can get it again from within Lite XL by right-clicking on the test_project directory and selecting "Open in System".
Now from back in your terminal, within the test_project directory, run llp-bc compile ./. Output messages from the compilation process will show up in your terminal and assuming the build completes (do you get a message similar to "Yay build successful" or something?) your project structure should now look like the following:
test_project
    |
    +--->src
    |     |
    |     +---> main.c
    |
    +--->build
           |
           +---> (various output products from compilation)
Be sure your computer is connected to your processor by USB. If you then run: llp-bc flash ./ a few quick lines should pop by and then your microcontroller should be "flashed" (meaning programmed with your code).
If you get the message, "Flash failed: Could not connect to an Espressif device on any of the 0 available serial ports," then your processor isn't connected correctly. Try unplugging and replugging it in.
The "output" of this code is a message being printed to your computer over USB. How can you see this message? Using the serial monitor which you can access using the command:
llp-bc monitor
[11:52:55.696] Current count: 4
[11:52:56.696] Current count: 5
[11:52:57.696] Current count: 6
[11:52:58.696] Current count: 7
If you press the RESET button on your microcontroller, you should see a disconnect message, followed by a reconnect and the count should start back up.
Note, the count may not start at 0 simply because your device doesn't immediately reconnect
WARNING: lost connection to /dev/cu.usbmodem1101 (read failed: [Errno 6] Device not configured). Reconnecting...
[monitor] Reconnected on /dev/cu.usbmodem1101.
[11:53:00.559] Current count: 1
[11:53:01.559] Current count: 2
[11:53:02.558] Current count: 3
[11:53:03.558] Current count: 4
[11:53:04.558] Current count: 5
[11:53:05.558] Current count: 6
Assuming you're seeing the count, then you're all good! YAY. When you're done seeing output, you can type ctrl-c to end the monitor program. Note: Your code will still be running on the processor until it's unplugged or re-flashed.
4) Build Toolchain (Windows Setup)
The setup process for Windows users involves a few extra steps, all of which are detailed below. We’ll be providing you with two ways to configure and run the necessary lab infrastructure.
The simplest, recommended, setup method will configure and run 6.1903’s toolchain inside of Window’s native environment which ultimately makes it easier to upload programs to the ESP.
If you prefer using Window’s Subsystem for Linux (WSL), however, or are having issues setting up the toolchain using the other setup instructions, we’ve provided an alternative method which configures and runs the toolchain in WSL’s environment.
4.1) Native Windows Environment Setup (Recommended)
Python Installation
The upcoming installation commands will be run from within a Command Prompt terminal. Open it by searching for "Command Prompt" in the Windows search bar. We’ll start by checking if you have python installed in your system. Do so by typing python --version in your open terminal and pressing enter:
-
If python is installed, running this command should print the python version. Make sure it's >= 3.10 .
-
If python is currently not installed, type
python(and press enter): this should prompt a microsoft store window to appear from which you can install python for your system. If for some reason this pop up does not appear, open the microsoft store app yourself, search “python” in the store, and install “Python Install manager” (this should be the first suggested app). Once this is done you can close the microsoft store and run the commandpython --versionin your terminal again. This should prompt python itself to be installed and the version should be printed once the process is complete.
Virtual Environment
Next up is installing the 6.1903 build toolchain itself. We recommend you create a python virtual environment to download the toolchain’s software into, although this is not fully necessary (just good practice).
Below is the sequence of commands to use when creating and activating a virtual environment in WindowsOS:
- Create the virtual environment:
python -m venv 61903_python. This creates a virtual environment whose name is61903_python.
- Note that the directory you choose to run the following command in is the one you will need to return to whenever you wish to activate said virtual environment (likely once to multiple times per lab). We would therefore recommend you run the above command in an easy-to-access folder. This ideally would be the folder you plan to keep all of your lab projects for the class in. You only need to run this command once over the span of the class.
- Activate the virtual environment:
.\61903_python\Scripts\Activate. Once you've run this command, your command line should have (6.1903) preceding it, indicating that a virtual environment is active, as such:
(61903_python) C:\Users\alexi\Documents\61903_test>
- Note again that to activate the virtual environment using the above command you should be running it from the same directory that the virtual environment was created in in the first place.
Completing the upcoming installation steps with your virtual environment active will make it such that the build software is installed inside of this virtual environment only. This means the llp-bc commands (which you’ll encounter soon) will only work when the environment is activated. If you successfully downloaded the software but notice that llp-bc commands aren’t being recognized, make sure you re-activated your virtual environment again!
llp-bc Installation
From here on out the installation process varies slightly depending on whether or not git is installed in your system. To check if git is installed, run the command git --version: if a git version is printed your system has git.
Provided your system has git, you may proceed to the llp-bc repository and follow the instructions until you finish the "Configuration" section to get the toolchain up and running. Since you’ve already created and activated the virtual environment, you can skip straight to the remaining installation instructions and go from there.
If you don't have git installed, follow the link to the repository containing the toolchain, click on the green box labelled "<> code”, and click the “download zip” option.
Once the zip is downloaded, open File Explorer. Within the app, go to your Downloads folder, right-click on the llp-bc-main.zip file, and select the “extract-all” option. When the pop-up appears, click “Extract”. This should create a folder called llp-bc-main that resides in your downloads folder. To install the contents of the package, do the following sequence of commands in your open terminal:
- Go to the directory containing the installation script by running:
cd %userprofile%\Downloads\llp-bc-main\llp-bc-main\ - Install the llp-bc package by running:
pip install -e .If that command doesn't work because pip can't be found for some reason, then try the commandpython -m pip install e . - Run
llp-bc configure. If you're unsure about what to type for a prompt or are having an issue, feel free to look at the instructions posted in the repository under the "Configuration" section. - Et voila!
You should now resume following the setup instructions from the Editor section.
Navigating Terminal Directories
You may need to go back to the directory containing your 6.1903 projects within your terminal for the remaining instructions (and generally for future labs). To traverse back to the directory storing your 6.1903 projects, you’ll need to use a series of cd commands.
- Run the command
cd %userprofile%to be brought back to the home directory (the one that contains the Downloads, Documents, etc… folders). - If your labs were in a folder named 61903_labs located in your Documents folder, you could do
cd Documentsfollowed bycd 61903_labs. 2 - You could also do the above commands in one step by running
cd %userprofile%\Documents\61903_labs. - If you want to see the contents of the directory you're in, use the
dircommand!
If you encounter any issues along the way, please feel free to go on the help queue and ask course staff for help!
4.2) WSL Setup (Alternative)
Again, if you aren’t familiar with WSL and haven’t tried the previous setup method, we highly recommend that you do so first.
If you don't have WSL yet, follow this link to get WSL-specific download and terminal usage instructions 3 (read starting at “How to Setup WSL2 for 6.205” until the start of the “Installing Icarus Verilog and GTKWave” section).
Once WSL is succesfully installed, go to the llp-bc repository and follow the installation instructions until you finish the "Configuration" section.
If you try to run llp-bc monitor right away, you'll probably get an error message along the following lines:
Found 0 serial ports...
Flash failed: Could not connect to an Espressif device on any of the 0 available serial ports.
ERROR:root:Could not connect to an Espressif device on any of the 0 available serial ports.
This is because WSL is a “guest” environment and needs explicit permission to access the physical ports that Windows manages. Without this permission, the ESP can't be found.
To enable this sharing (and consequently interacting with your ESP), follow the following steps:
- Run the command
winget install usbipdin Windows Powershell. - Open Windows Powershell as an administrator (typing “powershell” in windows search and clicking “run as administrator” is one way to do this)
- Run the command
usbipd list - Find the device with a name along the lines of
USB Serial Device (COM5), USB JTAG/serial debug unitand make note of the associated VID:PID. In the case below, this VID:PID would be 303a:1001.
BUSID  VID:PID    DEVICE                                                        STATE
2-2    045e:0c1e  Surface Camera Front, Surface IR Camera Front                 Not shared
2-6    303a:1001  USB Serial Device (COM6), USB JTAG/serial debug unit          Not shared
2-10   8087:0029  Intel(R) Wireless Bluetooth(R)                                Not shared
- The following command shares the device across the different systems:
usbipd bind --hardware-id=303a:1001(notice how the hardware-id field matches the VID:PID number). - The following command specifically attaches the device to WSL:
usbipd attach --wsl --hardware-id=303a:1001 —-auto-attach
Note that WSL and Windows can’t both be attached to the same device at once: if you decide at some point to switch from running the toolchain in WLS to native Windows, you’ll have to detach the device using the following command: usbipd detach --hardware-id=303a:1001 (and afterwards follow the setup instructions for toolchain in native windows environment).
If you shut off your laptop or close your terminal session, you may need to reattach the device. If the setup lab's test was successful but you find yourself unable to flash and/or monitor your ESP device at any point during future labs, make sure you have re-attached it!
You should now resume following the setup instructions from the Editor section.
If you encounter any issues along the way, please feel free to go on the help queue and ask course staff for help!
Footnotes
1 Alternatively, you can do this by opening your file explorer app, dragging the folder you wish to make your project folder (test_project in this case) into your open liteXL window, and then waiting for the new window to pop up.
2 If you find yourself needing to switch drives (from C:\ to D:\ for example), you should add the /d option before CDing. It would look something like this: cd /d D:\Your\Folder
3Thank you to Kailas the G.O.A.T for these instructions people still refer to years later