Snake 🐍
Please Log In for full access to the web site.
Note that this link will take you to an external site (https://shimmer.mit.edu) to authenticate, and then you will be redirected back to this page.
1) Attendance
Make sure to scan a QR code from the front and then sign in. You must sign in before proceeding (so resolve any WiFi-related issues now before moving on).

2) Logistics
- This lab has 2 checkoffs and 1 code submission. These all must be completed for full credit on the lab.
3) Snake Game
Snake is a type of game where the ultimate goal is for the player to grow the snake as long as possible without the snake colliding with itself. However, the longer the snake grows, the more difficult this task will become. You are your own worst enemy.
Slither.io was the snake-type game that was big a few years ago. They essentially took this concept and made it multiplayer. It was fun.
Gameplay is as follows:
- A single player controls the snake's movement around the board using 4 arrow keys. The snake moves continuously throughout the game (it doesn't stop or change speed).
- The snake grows when it eats food laid out on the board. The snake eats the food by running through it.
- The game ends when the snake's head collides with its body.
Take a minute or so to try out the game here in order to familiarize yourself with the high-level idea of how it works.
We'll begin implementing this today in lab, and then we'll complete it in the postlab.
4) Hardware Setup
Here is our circuit diagram for today's lab.

If you still have your LED display wired up correctly, awesome. Keep it that way. If you don't still have it connected, refer to Postlab 1 for how to connect it.
Our game will use 4 buttons to navigate the snake around the board, and 1 for game reset.
BTND: will direct the snake downward on the boardBTNL: will direct the snake to the left on the boardBTNU: will direct the snake upward on the boardBTNR: will direct the snake to the right on the boardBTNF: game reset
Connect these buttons to the ESP32 and then you're ready to move on to the rest of the lab
5) Software Setup
5.1) Starter Code
Download the starter code for today's lab here:[Starter Code]. There will be one file in thesrc folder:
main.c, your main C file. This file is our "entry point", a file that contains a function which the system will "start" from.
In addition to the starter code from the website, please copy over 6190.h file from lab 2 into the src folder (the 6190.h file from either the lab or the postlab will work).
#include "ascii.h" line from the top of 6190.hLike lab 2, you can use any functions implemented in 6190.h throughout this lab.
5.2) Setup
Everything you need in terms of setting up GPIO pins and the LED array has already been done for you in setup() (located in main.c). Take a look and make sure you know what that code is doing.
Now onto the game!
6) LED Display: Pixel-by-Pixel
6.1) Representing Location
We will use our LED array as our game display, so we will need to keep track of which LEDs should be illuminated at a given point in the game in order to render the snake and food. In addition, game logic will depend on the location of the snake's head relative to food, as well as to its body. So we must come up with some way to represent location.
Our 8x32 LED display has 256 LEDs, so we will need 8 bits in order to associate each LED (or location) with a unique value from 0 to 255.
Furthermore, we have a two-dimensional game board, so we will find it helpful to break each uint8_t location into (x, y) coordinates, like so:
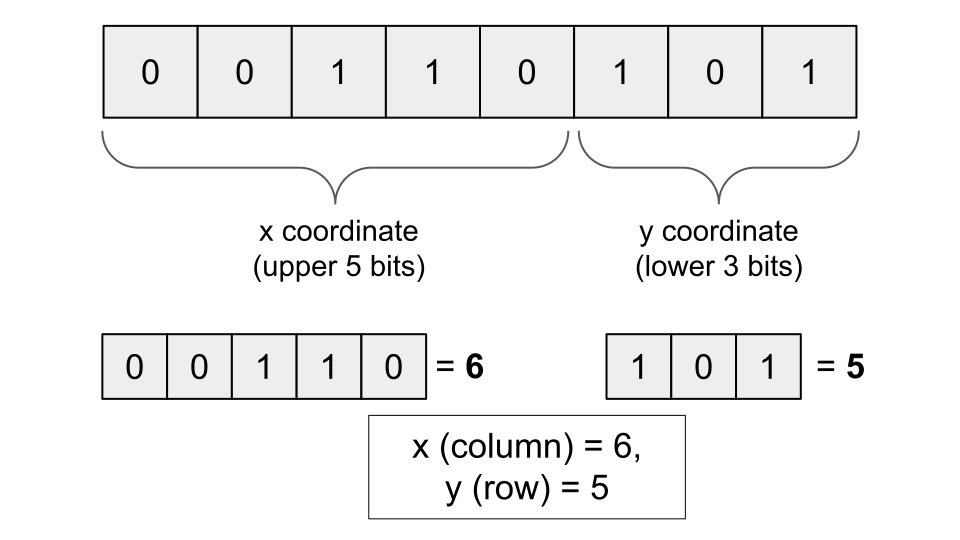
We are going to need to do this a lot, so we will start off lab today by writing some helper functions.
6.1.1) Reading X and Y Values
Let's first write functions that will allow us to read the x and y coordinates from an 8-bit value.
First, implement getX(). It will take one argument:
uint8_t location: an 8-bit unsigned integer representing one of the 256 locations on the game board.
It should extract the upper 5 bits from location and return them. This is the x-coordinate of the location on the game board.
Once that's passing all test cases, paste it into the getX() function defined in main.c.
Next, implement getY(). It will also take one argument:
uint8_t location: an 8-bit unsigned integer representing one of the 256 locations on the game board.
It should extract the lower 3 bits from location and return them. This is the y-coordinate of the location on the game board.
Once that's passing all test cases, paste it into the getY() function defined in main.c.
6.1.2) Modifying Location
We are also going to want to update the locations of various things (specifically, the snake and food) throughout the game.
Implement setX(). It will take two arguments:
uint8_t *location: a pointer to an 8-bit unsigned integer representing one of the 256 locations on the game board.uint8_t new_x: an unsigned integer representing the value (0-31) that we'd like to set for the x location.
setX() should modify just the upper 5 bits of the value stored at location to be equal to new_x. All other bits in the value stored at location must remain unchanged.
If new_x is greater than the largest possible unsigned 5-bit value, then setX() should set the new x position to be new_x % 32
Once that's passing all test cases, paste it into the setX() function defined in main.c.
Next, implement setY(). It will take two arguments.
uint8_t *location: a pointer to an 8-bit unsigned integer representing one of the 256 locations on the game board.uint8_t new_y: an unsigned integer representing the value (0-7) that we'd like to set for the y location.
setY() should modify just the lower 3 bits of the value stored at location to be equal to new_y. All other bits in the value stored at location must remain unchanged.
If new_y is greater than the largest possible unsigned 3-bit value, then setY() should set the new y position to be new_y % 8.
Once that's passing all test cases, paste it into the setY() function defined in main.c.
Cool, now that that's working we don't need to think too much about the representation of location under the hood as we implement our snake game (but what's important is that we understand and appreciate it).
setX, setY, getX, and getY6.2) Rendering the Gameboard
In our previous assignments, we directly updated our screen buffer (screen_buffer defined in 6190.h) whenever we wanted to update the LED display.
All of the objects in our Snake game will be associated with an unsigned 8-bit value (uint8_t) indicating the object's location on the game board. To render our objects on the board, we must modify individual pixels in screen_buffer. We will need to do this a lot, so we will write a helper function that will either set a pixel (turning the LED on) or clear a pixel (turning the LED off) at a given location.
Implement setPixel(). It takes in 2 arguments:
uint8_t location: The location of the LED to be turned on/off.uint8_t val: The binary (0 or 1) value indicating if the LED at position (x, y) should be off (0) or on (1).
setPixel() should use these arguments to modify a single bit in screen_buffer. You may find it helpful to break the location down into its x and y coordinates.
If pix is the location of the LED to illuminate:
setPixel(pix, 1)should turn on the LED at the location indicated bypixsetPixel(pix, 0)should turn off the LED at the location indicated bypix
Note that the upper right corner of our LED array corresponds to coordinates (0, 0), same as last week.
This function should just update the screen buffer, and should not actually trasmit the screen buffer values to the display. This function will be called various times throughout a single iteration of the code's main loop, and we only want to update the LED display once per loop iteration.
Once that's passing, paste your implementation into setPixel() defined in main.c.
7) The Snake
The main character of our game. We will represent the snake using a struct, which is defined as follows:
struct Snake{
    uint8_t body[SCREEN_COLS*SCREEN_ROWS]; // can get as large as entire screen in theory
    uint8_t direction;
    uint8_t length;
};
Let's go through each of these members.
7.1) Snake Body
The snake itself can be represented as an array of 8-bit integers, where each element represents a location on the game board. We've named this array body. The snake in this game will be rendered on the 8x32 LED array, so we need to know which LEDs to illuminate as the snake moves around the board.
body array (snake->body[0]), while the rest of the body will be the snake->length - 1 elements after it.Because the snake grows throughout the game, it's dynamic in size (and thus the amount of memory needed to store information about the snake isn't constant). This would be good motivation to use dynamic memory allocation (in the form of malloc() and free()), which we'll learn about in a few weeks. For now, we will just make sure that we have allocated enough memory to represent the snake when it's at its largest, which would be the area of the entire board (good luck getting the snake that large when playing, though). This is the product of the number of rows and the number of columns on the LED array.
7.2) Snake Length
Because we are using this fixed-size array to store information about our snake, you will need to keep track of the snake's length, making sure to update it manually as the snake grows throughout the game. We have left the utopian (or dystopian, depending on how you feel about it) world of convenient functions such as .append() and len(). That's a different snake.
7.3) Snake Direction
The snake moves continuously throughout the game. If the player doesn't change the snake's direction (via a button press), then the snake should continue to travel in the same direction.
We have defined an enum in main.c with all of the possible directions in which the snake can travel:
enum snake_direction { up, down, left, right };
7.4) Snake Initialization
In the starter code (app_main()), we have initialized the snake so that when the game starts:
- The snake's head is at the upper right corner of the LED display
- The snake's length is 1.
- The snake will travel in the left direction.
Note that the snake's head is the first element (index 0) in the array body.
8) Rendering the Gameboard
8.1) Snake
In order to display the snake, we need to set the pixels at the location values stored in the body array.
8.1.1) Drawing The Board
We have declared a function, drawBoard(), that takes in two arguments:
struct Snake *snake: pointer tosnakestructuint8_t food: the location of the food that the snake will eventually eat
Implement drawBoard().
- Use
eraseBuffer()to fillscreen_bufferwith 0's. - Use
setPixel()to turn on the LEDs at (1) the locations stored in the snake'sbodyarray and (2) the location indicated byfood(we'll coverfoodmore in depth later, but for now it's just another location we'll need to illuminate). - Transmit the screen buffer to the LED display by making a call to
drawBuffer().
Are we passing in a copy of the Snake struct or a pointer to it? Remember that we use different operator(s) to access/modify its members depending on if we are passing in a copy of a struct or a pointer to a struct.
Once that's passing all of the test cases, paste it into the drawBoard() defined in main.c. Build the project and upload it to the board. The LED in the upper right corner of the display should be lit.
9) User Input
The user interacts with the game by pressing one of the four directional buttons. Our system must be able to derive some meaning from these button inputs and act accordingly. For example, if the user presses BTNL, the snake should move to the left (in most cases).
We will need the main loop of our program to:
- Detect a button push (similar to what we did last week, but now we have 4 buttons to check!)
- Identify which of the 4 directional buttons was pushed to determine the intended direction of the snake, and update
snake.directionaccordingly. One constraint is that the snake cannot turn 180 degrees. So, for example, if the snake is moving to the right and the player pressesBTNL, then the snake should continue moving to the right. - Last week we needed to do edge detection for the button. Think about how the buttons will work with snake. Do we need to do edge detection for the direction buttons?
You can assume that only one button is being pressed at a time by the player.
Implement this functionality in the section of app_main() (defined in main.c) indicated by the comment:
////////////////////////////////////
// INSERT BUTTON PRESS LOGIC HERE //
////////////////////////////////////
You may also need to add variable declarations elsewhere in the program.
10) Snake Movement
The primary action in this game is the snake's movement. For the snake to move, each element in the body will just follow the one right in front of it. However, the head's (the first element in body) direction of movement is dictated by user input.
The snake will never stop moving (until the game is over), so the only thing we have to worry about is what direction the snake should move in a given call to our snake update function.
Complete updateSnake(). It takes in 1 argument:
struct Snake *snake: A pointer to the snake struct.
Modify updateSnake() in your main.c file directly, so you can debug by looking at your LED array. First, verify that updateSnake() works as expected with your tiny length-1 snake. You should see two things on your screen:
- Your length-1 snake (a single pixel) moving around. If it reaches an edge of the game board, it should wrap around (ex. if it exits the board on the left side, it should enter the board on the right, while staying in the same row).
- The LED in the upper right corner of the board should be on -- this is the food (notice how we initialized it's value to be 0?)
Once that behavior seems good, use this larger snake to check that updateSnake() works on a snake with length greater than 1.
for (int i=0; i<3; i++){
  setX(&snake.body[i], 5);
  setY(&snake.body[i], 3-i);
}
snake.length = 3;
snake.direction = left;
Make sure to comment out these lines above:
snake.body[0] = 0;
snake.direction = left;
snake.length = 1;
We will start our games with the length-3 snake.
Show your fixed-length snake moving around the board. It should change direction on a button push.
So now you have a roaming snake that has no real purpose. Let's give it some, starting with food. A great motivator.
11) Food
We will represent food using a uint8_t holding its location on the gameboard, just like each element in our snake body array.
11.1) Food Generation
In main.c, there is starter code for a function, generateFood(), that randomly generates coordinates for the food. However, these coordinates cannot be coordinates that are already taken up by the snake.
generateFood() takes in 2 arguments:
struct Snake *snake: A pointer to the snake struct for the current game.uint8_t *food: A pointer to the variable holding the current location of the snake food.
Complete generateFood() so that it:
- Generates a new random location for
food(using the random value stored atRANDOM_VALUE_ADDR) - Checks if this new location for the food conflicts with any locations occupied by the snake. Note that every time you read from this memory location, this value may be different! So, you should not read a new value from
RANDOM_VALUE_ADDRfor each comparison. Additionally, be wary of data types when making comparisons. - If they do conflict, return unsuccessful (1).
- If they don't conflict, update the location of the snake food with this new location and return successfully (0).
You should directly modify generateFood() in your main.c file.
We call generateFood() from the section of the program before the while loop, in order to set an initial position for the snake food. Our game will also want to call generateFood() during the game, but we'll deal with that during the postlab.
You can test your generateFood() by ensuring that the food starts in a different place every time your program starts. You can use the reset button at the top left of the ESP32 to do this. Feel free to ask a staff member if you're having trouble finding the button.
12) Code Submission
Submit your main.c and 6190.h files in a zip file named None_lab3.zip.
To create the zip file, you can select the folders/files you want, right click, and look for the option to compress these files.
Alternatively, you can run one of the following commands in the terminal:
If you're on MacOS or Linux:
zip None_lab3.zip src/6190.h src/main.c
or for Windows users,
Compress-Archive -Path src/main.c,src/6190.h -DestinationPath None_lab3.zip
main.c and 6190.h files here in a zip file. Name the file None_lab3.zip for this assignment.
13) Checkoff
Please make sure to upload your code above before joining the queue for the checkoff!
Show that food gets rendered correctly on the board (there should be an LED, that is not a part of the snake, illuminated on the board). Be prepared to explain what would happen if the food coordinates conflicted with the snake. Double check you implemented generateFood as specificied in section 11 (even if it visually works, it may not be correct).
So now we have all of the necessary objects for our game. In the postlab, we will actually put this all together into a functioning game. Please save your project and leave your wirings intact. The postlab is a continuation of all this.